With the new year 2012, it seems like my goals continue to improve with organization. I am no perfect at it by any means, and have lots of room for improvement ... but the idea behind organization isn't really perfection, it is just doing a few things one day at a time to relieve stress! That is really what it does! Organization creates freedom!
Recently I found an awesome calendar on Pinterest that was much too awesome not to share with you today.
 It is a calendar for the entire year that gives you simple steps each day to de-clutter in 2012!! I have printed it out and can't wait to get started. Click here to download and print calendar as well as check out the awesome website www.mysimplerlife.com the Although there are a few things that don't relate to me, I figure 99% of it does, and it is something to keep me going each day.
 The next thing I have been working on this week is wrapping up organizing my 2011 pictures, getting ready to make my year end photobook, putting all the pictures in my planner ... and trying to start out the new year right. In June of last year I did a post on the Crafting Chicks blog all about photo organization. I never posted it on my own blog, so I figured it would be a great time to share it with all my blog readers! Happy Organizing to all of you!
First, this post is for scrapbookers, and non scrapbookers. It is for anyone who takes photos and wants to preserve their memories!
I am sure many of you are a lot like me ... you have boxes and boxes of photos, files upon files of digital photos, yet when it comes to remembering when each photo was taken, we all get a little bit on amnesia. It is easier to let the photos sit on your computer, or collect dust in your basement right?
Today I hope to show you a way to at least organize your photos, and then hopefully inspire you to take the plunge and store them yourself. I also want to encourage you to find a way to enjoy the photos too!
My biggest fear is to loose my digital photos. I am a visual person, and can spark a memory by just looking at a picture. (I guess that is why I take thousands a year!) It is very important to back them up, so that if I ever have computer troubles, I won’t loose them. Let me introduce you to a dear friend:
Mr. External Hard Drive!

You can by External hard drives really anywhere ... Costco is where I got mine. It is 1 Terabyte. You can also find them here on Amazon. They run about $100.
Now you might say, that you don’t really want to spend the money, but trust me ... you won’t regret it! It is a lot cheaper than hiring someone to try and get photos off of a fried computer. Often times, computer experts will recommend that you purchase two hard-drives, just incase the one fails, however I haven’t gotten that far yet!
My computer told me the other day, that I had way too much stuff on it, and I couldn’t save anymore! (Can you blame it when I have close to 13,000 pictures on it!) So I decided to transfer them all to the hard drive. Then I started to get nervous and I slowly started to delete them off my computer. I tried to take them and upload them to a photo browser like Shutterfly or Costco, but it was taking HOURS. I felt like I really needed to make sure I had a second back up, and I needed a faster way!
Rather than spending another $100 to buy another hard-drive, I spent about $20, and I went and bought me some printable DVD’s.
 I have really had such a great time organizing the last couple of years of my life. Here is how i chose to do it:
First: Organized my photos into years by creating a folder for each year.

Second: Split each year into seasons (spring, summer, winter, fall)

Third: Split each season into individual activities / holidays. (lagoon, fourth of july, etc.)

Fourth: Now that they are organized, I decided to add the photos that are on all those floating disks. These could be disks others have given to me, along with disks from photoshoots, etc. This will be a back-up incase one of your disks get ruined.
Fifth: I saved all the individual seasons onto a DVD. (So for every year I have a Beginning Winter, Spring, Summer, Fall, and Winter end disk). The reason I say a DVD, is because it has a lot more space on it than a CD. Many people would argue whether or not to get “gold” disks, or other types of disks that claim to be more archival ... I personally didn’t spend the money, because these are just a “back-up” of what is already on your hard drive!
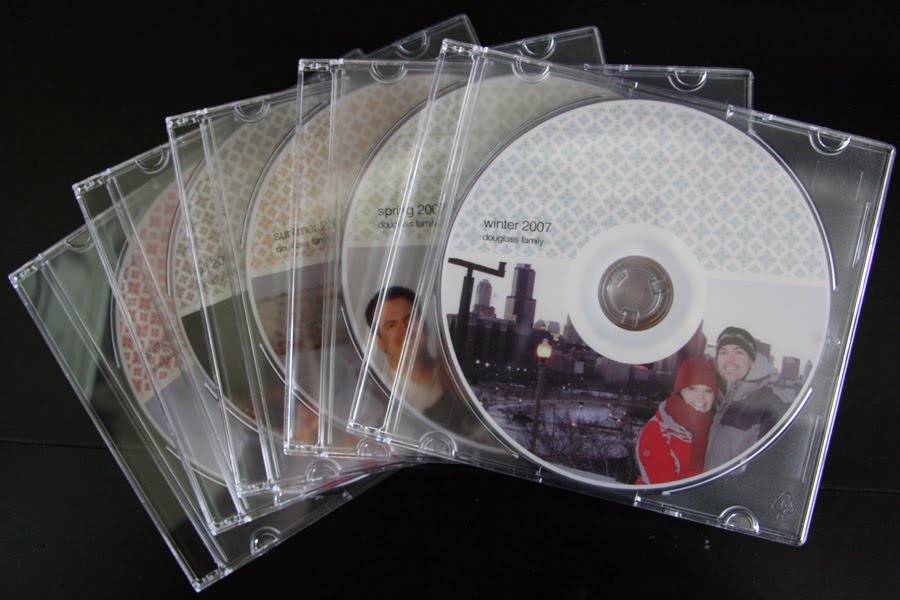
Sixth: Mark the disks - This was my favorite part. I have this printer:
 It will print on your disks, rather than just a sticker! Aren’t the photos just fun?
  For time sake, and organization sake, invest in a good cd marker and be on your way!
Seventh: Get some really inexpensive boxes from Ikea to store them in.

Eighth: Create Tabs. File the 5 disks, along with the “loose disks” from each year behind each disk. I like to color coordinate mine.


Nineth: Find your favorite photos from each Season. It will be impossible to scrapbook every photo, and will cost you hundreds of dollars if you end up printing them all. So create a folder on your desktop and copy your favorites into that folder. NOW, this might take some time, but if you do a little each day, you will be pleased with the time spent.
Tenth: Create a photobook. As much as I love to scrapbook, using darling paper, fun embellishments, and have full access to creativity, I also am realistic. Here are my reasons for a photobook for recording your year:
Cost effective.
Easy to print one for each of your kids. They will have a small library when they leave home.
You won’t have to add a room onto your house for the 4” heavy Albums ... instead maybe just a small shelf.
There are endless possibilities, sizes and programs! For the studio 5 segment I did on Photo books click here!
I mainly create my photobooks as a journal and history of my family that year.
So you might ask, so when do you scrapbook your photos? Well, I like to create mini albums of events, vacations, or special themes. I also have created a special one for both of my cute boys of their first year!
In conclusion (lots of information to process, I KNOW), but my reasoning for doing organizing my photos in this way is to make sure I can organize my family memories, so I can remember them, and most importantly to create a back-up of my photos.